
How do you navigate on a bicycle tour? And what’s the best way to navigate? Well, below are a whole bunch of free methods to find your way on a bicycle adventure. I’ve used all these free methods to navigate at one time or another and to varying degrees. It’s true that some ways of free navigation are better than others—but it’s always beneficial to have a backup plan in case your map is lost/stolen/spoiled or your GPS runs out of battery. They all have their quirks, and they all work (at least, usually…)
Free Way to Navigate No1: Draw Your Own Map

You might think drawing your own map sounds silly. But I’ve travelled thousands of kilometres from scribbles on a scrap piece of paper. The most important things about the scribbles are:
1. that they’re orientated north,
2. the roads point in the correct direction and
3. they have either town names or points of interest so you can track your progress.
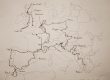
Whack open a map on a computer or phone before hand and simply copy the roads you want to take, taking care that the directions are correct. This means you can use your compass (I’m assuming you have one, or at least have another way of finding north -see below-) to orientate yourself. For example, you might be cycling on a fairly easterly road for a while and then need to head north-east at a certain village. Write down the name of the village and then draw a line projecting from the village in that direction.
It also helps to write the distance next to the line, and helps even more if it’s not to scale. This is so that you can fit everything on one piece of paper and you can see everything at a glance. The picture above shows this and how I navigated across Northern Spain. I also mark roads which I should not take.
Fun fact: World maps are extremely inaccurate.
Free Way to Navigate No2: Write Down the Town/City Names

Long and straight routes don’t have to be boring. Both times when I crossed the north of Italy, I followed straight and simple roads. My main aim here was to cover some distance. In Italy the road numbers are not usually displayed on signs, so I relied on the town names to direct me. (In some countries, like in France, the road numbers are displayed above every sign, so it’s more difficult to get lost.) Just write down all the major towns of your route from Google Maps and there you go; you can just get on with it. Stick your headphones in and listen to a few audio-books.
It should be noted that the signs pointing to the next town on your route can actually point the wrong way. This is to help traffic flow, which is fine if you’re in a vehicle and don’t mind taking a short detour around the towns and cities to save time. However, it will not save you time on a bicycle: you’re better off just heading through the city. I also make a point of doing this to see what the centre of the city is like. I’m also ever-curious as to the state of cycling and pedestrianisation in city centres. Once you reach the centre of the town or city, which is normally clearly signposted (Centre, Centro, Centrum, Centre Ville, Centro Città, Zentrum or Stadtmitte (parts of Germany)) you can begin to follow the signs to the next destination. A compass is also useful to check you’re heading the same and correct direction.
Fun Fact: People have been using compasses for over 3000 years.
Free Way to Navigate No3: Take Pictures of Maps on Your Camera

Taking pictures of maps is so useful for navigating in a city. I usually use this method for finding my way to wherever I’m staying (like a hostel or person’s house). It’s just so much quicker and easier than downloading maps onto your phone. I get the map on the screen on my laptop or mobile and take a few shots. I zoom out on my computer enough to see the road I propose to enter the city on, and then gradually zoom in taking photos each time. It usually helps if you half-imagine a way to your desired location, normally by taking main streets. As most cities have a river it helps to use that to your advantage as well, perhaps by following the river to a main road near the street of your desired location. Parks and large green areas are also useful indicators in cities. I even navigated from Tétouan to Fez in Morocco using only photographs of a paper map from another bike tourist. If you’re inclined, I guess you could even sneakily take a few photos of a map in a shop, though I haven’t done this (yet).
NOTE: Just make sure you have enough battery left to actually view your photos. I remember cycling around Nice in France all night looking for the hostel I had booked because my camera battery had run out. I eventually (and luckily) stumbled across some guests of the same hostel who helped me get there.
Fun fact: Today, the number of photographs taken every two minutes is the same as the number of photographs taken by mankind in the 1800s.
Free Way to Navigate No4: Use a Print-out from Google Maps

I’m unsure of the legality in this one. But in a hypothetical situation, you can print out the maps and quite easily find your way around, especially with the aid of a compass. It is also slightly more adventurous than using a real map because often details are missing and the likelihood of getting a bit lost (but not lost lost) is higher. I hypothetically met two girls from Switzerland who were hypothetically using google maps to navigate all of their trips in various countries, and without any problems. It’s useful if you aren’t going to have internet and/or power for a while.
Fun Fact: You can use Google Maps to see the effect different nuclear bombs have on your town.
Free Way to Navigate No5: Only Use a Compass

Navigating only by using a compass is a fun idea, and I’ve tried it a few times, but quite often it ends up being quite complicated and messy. Without any idea of the towns or villages in between you and your destination, you can end up cycling for a fair bit away from your desired destination. Beware: roads often take wide swooping curves or may appear to be heading off in one direction only to change direction unexpectedly later. At some point you will inevitably come to a T-junction where neither road is heading in the direction you want to go. My advice is only use this if you want to engage adventure mode 100%.
Fun fact: Compasses don’t actually point north. Gyrocompasses do.
Free Way to Navigate No6: Get Free Maps from the Tourist Office
Using only free maps from the tourist office can be an effective way to keep costs down. They also usually provide you with the best the area has to offer. Tourist offices are always clearly signposted in cities so finding them should be no problem. It has worked wonders for me in Germany, France and Switzerland, even if it only supplements a map you already have. All across the western side of Germany, especially near the border there are plenty of cycle routes, many off-road and on gravel paths, and you can get maps for all of these at the tourist offices for free. In total I’ve cycled more than 1000km using only free maps from tourist offices.
Fun fact: Tourist offices normally have free WiFi.
Free Way to Navigate No7: Use Free Mapping Software on Your Phone

There are a few problems with this one. The power source can be an issue as smartphone batteries sometimes don’t last longer than a day. You can take a power bank to recharge your phone a few times, but this might not be the most practical option. Though if you have a dynamo hub (you get power when you cycle from the wheel) then this might actually be the best option for you. It does take a bit of time to select and download maps onto your device, and you are not really free to change your route either, you’re stuck to what you’ve downloaded. Detailed maps can also take up a lot of space on your device. Despite saying this, I do this sometimes, but don’t always find it particularly intuitive or practical.
Some companies that offer free mapping software on your mobile phone:
Maps.Me

Maps.Me is probably the best offline mapping software for Android. It offers free and unlimited downloads of maps worldwide, you could even download the whole world if you have space on your device. It’s sleek and easy to use, and has searchable addresses offline too. It also includes road and street numbers.
HERE WeGO

HERE WeGo used to be called “HERE maps” and is probably the main cross-platform competitor to Google Maps. Developed by Nokia, it uses OSM (Open Street Maps) and once you register you are free to unlimited downloads of offline maps. Works well but lacks some features and doesn’t show topography well.
Maps and Navigation – by OsmAnd

The good thing about OSMand is it’s dedicated to offline mapping software. The problem is it’s so detailed that it can be a little slow. The free version is limited to only 10 downloads so I have long since stopped using it. It also doesn’t show topography unless you pay for it.
Galileo Offline Maps

Galileo is one of my favourite offline mapping software and is probably the best for bicycle touring. It functions exactly like a paper map, and doesn’t include all the addresses, numbers and places of interest (like restaurants you will actually never eat in) and so it doesn’t take up as much space on your device. It’s also super fast.
Now Google has a download map option on it’s maps application called “offline areas”. It’s pretty useful though it’s only really practical to see a square 100km area. Any more and it starts to take up a lot of space on your device. On short trips it would be ideal to download big cities if you plan to visit them…this will help you get through the complicated streets a lot more easily, or find hotels, hostels in the city etc. All Google Maps are deleted after one month unless continually updated.
Free Way to Navigate No8: Use Cached Data on Your Mobile

I discovered this one a little by mistake. If your smartphone has enough internal memory and you leave the Google Maps app open (and sometimes closed too), it will often cache the data it has downloaded, say from an earlier WiFi spot in a café, and you can use it to aid you. The trouble is, it is quite selective about detail, but does give a good indication of the direction and distance of towns and cities, with the names. I would use this only in emergencies or if you’re inclined, like me, to take unnecessary risks.
Fun fact: 2,500,000,000,000,000,000 bytes of data were generated *every day* in 2012.
Finding North
Free Way of Navigation No9: How to Navigate by Using the Sun

For a long time I didn’t believe the sun was real. I had only seen it in movies and in pictures. Then I left Scotland.
The sun rises roughly in the east and sets roughly in the west. It’s approximately over south at midday (north in the southern hemisphere). During daylight saving time it will be south closer to 1p.m. If you put a stick vertically in the ground, the shortest shadow it creates during the course of a day (more or less at midday) will give you a direct north-south line, anywhere in the world. But if you have a watch, just wait till midday and check that way, it’s easier. Midday = South.
Fun fact: In Morocco during Ramadan, I cycled 200km from east to west and the fast was broken 2 minutes later because the sun set 2 minutes later.
Funner fact: If you’re on the International Space Station, you will see 15 sunrises and 15 sunsets every day.
Free Ways to Navigate No10: How to Navigate by Using the Stars
There is a misconception that I will tackle here. The North Star is not the brightest star in the sky (just thank me after the apocalypse, cheers—I’ll accept beer as payment if it still exists). After the moon there are several objects in the sky brighter than Polaris (the North Star) depending on the orbits of the planets. Venus, Jupiter, Mars and Mercury are all brighter and the stars Alpha Centauri (the closest two stars) Sirius (the brightest star) and Canopus are all brighter too. The North star is just a normal looking star. Though it should be noted that the North Star is the brightest in that part of the sky. It is significant (and famous) because regardless of time or season, it always appears to sit above the north pole in the sky. It’s extremely accurate. You can find it as follows…

As you can see, my MS paint skills are pretty good. I might have got Cassiopeia upside-down though.
Find the “big dipper” or “saucepan” constellation. Follow the edge of the pan (the side without the handle) upwards (relative to the orientation of the pan) about 4 or 5 lengths of the edge. Voilà, you can’t miss it—it’s the only bright one there. It’s also roughly half way between the saucepan and Cassiopeia, which I just call “the zigzag one”.
Fun fact: The largest known star VY Canis Majoris is 1,800 times bigger than the sun.
Free Way to Navigate No11: How to Navigate by Using the Moon
The moon is pretty useless for navigation. But, if it’s a crescent moon or half moon, you can do this and it will always point you roughly to the south pole.

The reason this works is because the Earth, Moon and Sun are all on a plane relative to each other.
In the southern hemisphere it points north.
Not so fun fact: There are enough chickens in the world to make a continuous chain of KFC Megabuckets to the moon and back, 3 times.
Free Way to Navigate No12: Ask People
Of course, you can always rely on people to get you where you want to go. I mean they do live there and have an intricate knowledge of the area, right? HA! I would only bother asking people where to go if you have run out of options. At best they will know the way to go by car and many will just waste your time with their ummmhs and aaahhs. You’ll be surprised how many people don’t have a bloody clue how to get to the next town down the road, and it’s way worse in cities. Try it if you don’t believe me. You won’t be disappointed with the wild adventures you undertake in vain courtesy of Joe Public.
However, if you’re looking for something in the same town, it’s more likely they can help you.
Fun fact: People are stupid.
Bonus: Make a Compass

If you have a speedometer on your bicycle, then you also have a tiny magnet on your front wheel. You can make a compass by using this magnet. If you have to use this method, I feel really sorry for you, as most likely you’re lost, in the middle of nowhere, without internet, data or phone signal and it’s probably cloudy.
1. You will need your bicycle magnet, a small straight piece of metal (like a sewing needle—if you’re on a bike tour, you really should have one—they’re useful), a piece of paper, tape and string or thread.
2. Stroke the magnet against the needle from one side to the other, in the same direction, about 50 times.
3. Tape the needle to a small strip of paper just bigger than the needle and tape one end of the string to the middle of the paper.
4. Hold the other end of the string completely steady so that the paper-needle is dangling about 10cm below. It should resemble an upside-down T shape where the vertical line is the string and the horizontal is the needle and paper. The “compass” should point north. Except you won’t actually know which way is north. You basically have a 50% chance of being completely wrong. But you can use the sun, star or moon methods above, and then mark N on the correct end of the paper.
I actually did this one day and it works. If it’s windy, you could use an empty water bottle and dip the string in there to steady the needle. Just watch out for static from the bottle affecting the reading.
Fun fact: We are overdue a switch in magnet fields, so north will become south and south will become north one day. Maybe.
In conclusion, the best way to navigate on a bicycle tour is by using a combination of the above.
Can you think of anything else? I’m all out of ideas.
Cheerio


Well Sonia is right, especially in moist climates like UK.
If you look at the moss growth on the rooftops it is almost always grows thicker on the north side.
Its only a rough guide. But if you’re lost anything is better than nothing.
It reminds me of the story of the tourist in Ireland.
They were in a hurry to get to a friends wedding.
So when the were in a small village they stopped and asked a local.
They said, could you tell us the quickest way to Cork.
The Irishman said, are you walking, or going by car ?
They said, by car.
The Irishman said, to be sure now, that would be the quickest way.
When I was at school I learnt that you can tell where the North is by looking at the tree moss and where it grows (thicker on the north side of the tree in the northern hemisphere). Thanks for making me review this, I just discovered that it is a myth… I guess we can’t rely on this kind of things anymore after climate changes.